Logging in

  1. Go to www.nextdose.org
  2. Enter your institutional email address and password
  3. Click login
Heads up! If you don't know your password, click here to reset it.

NextDose workspace


Create a new patient

  1. Click New patient at the top of the patient list
  2. Enter a unique ID (NHI in New Zealand)
  3. Choose a sex
  4. Enter date of birth or age
  5. Optionally enter the patient's name(s) and other information
  6. Click Save changes
Heads up! If you are a member of multiple groups, a drop down will be displayed allowing you to choose which group the patient should belong to.

Add a medicine to a patient

  1. Click Add a new medicine at the top right of the screen
  2. Click on the medicine you want to add
  3. The Doses & observations pane will be displayed
  4. A form is displayed on the right, where you can enter information about doses and observations. Weight is selected by default.
  5. Enter the patients weight and the date and time of the measurement
  6. Click Save changes
  7. Continue to add more doses and observations

Adding doses

  1. Click Add dose at the bottom middle of the screen
  2. Enter the date and time of the dose (start time if the dose is an infusion)
  3. Choose the route and unit of the dose from the dropdown menu
  4. Enter the dose
  5. If the dose is an infusion, you can enter the duration of the infusion (minutes or hours) or the date and time that the infusion ended. If left blank, the infusion is assumed to be a bolus (less than 1 minute).
  6. If the same dose is repeated multiple times at a constant interval, check the Repeat checkbox. You cannot use a specific infusion end date/time if this option is selected.
  7. If repeating doses, enter the dose interval and the number of doses. Click At steady state if the patient is likely to be at steady state at the time date/time specified for the dose record e.g. the patient is on long-term tacrolimus
  8. Click Save changes

Adding observations

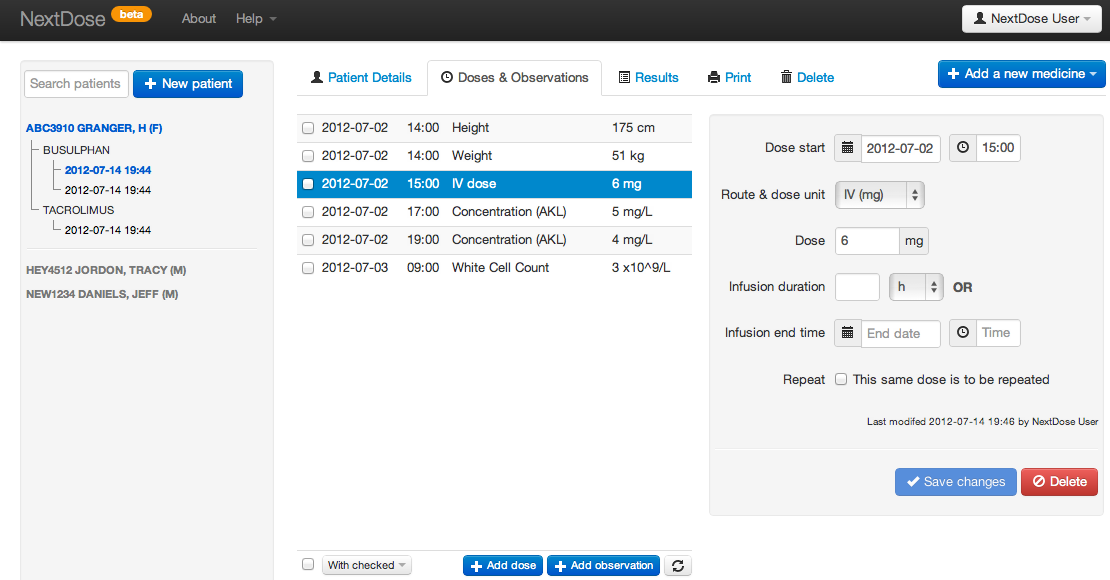
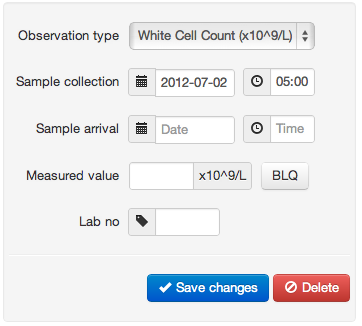
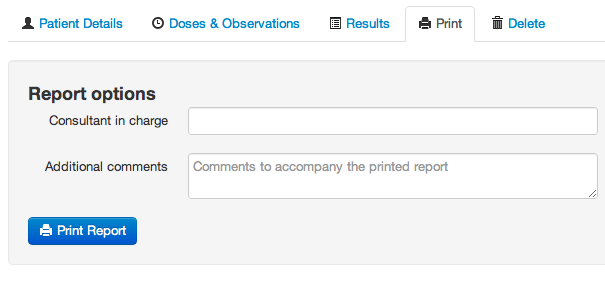
Observations include concentration and other lab measurements in addition to clinical observations such as weight and height

  1. Click Add observation at the bottom middle of the screen
  2. Choose the observation type from the dropdown menu
  3. Enter the date and time of the observation (collection time for lab measurements)
  4. Optionally enter the sample arrival time for lab measurements
  5. Enter the value of the observation. If below the limit of quantitation, click BLQ.
  6. Optionally enter a lab number for auditing purposes
  7. Click Save changes

Navigating patients and records

What is a record? A record is a collection of doses and observations and any associated calculation and report. Once a calculation is made, the record becomes locked so that the input data can be matched with the report. If a change to the input data (doses and observations) is attempted, the record is cloned and the change saved. This new record can continue to be modified until a calculation is run. A record will also be cloned if an existing calculation is recalculated.

Navigating within records

What is a record? A record is a collection of doses and observations and any associated calculation and report. Once a calculation is made, the record becomes locked so that the input data can be matched with the report. If a change to the input data (doses and observations) is attempted, the record is cloned and the change saved. This new record can continue to be modified until a calculation is run. A record will also be cloned if an existing calculation is recalculated.

Results

  1. Click the results tab. If a calculation has been run, the report will be displayed. Otherwise calculation options will appear.
  2. Choose one or more Dependant variables. Check only concentration if unsure.
  3. The Target and Dose interval can be changed from the defaults displayed
  4. The Calculation comment can be useful for organising multiple reports by briefly describing differences between them
  5. Click Calculate and wait up to 30 seconds for the report to be generated
  6. A report, or error message will be displayed

Printing

  1. Click the print tab. A calculation for the record must have been run in order to print.
  2. Optionally enter the name of the Consultant in charge to be attached to the report
  3. Optionally add Additional comments to appear on the printed report
  4. Click Print. You will be directed to a printer-friendly report.

Account menu

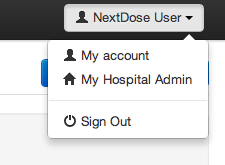
The account menu is labelled with your name and is located in the top right corner of the screen. It provides:


User manuals can always be improved. Please direct suggestions or questions here